Contents:
- The Seven Main Methods for Attaching Hair Extensions
- Clip-In Extensions: The Non-Permanent Choice
- Tape-In Extensions: The Semi-Permanent Solution
- Sew-In Extensions: The Traditional Method
- Fusion or Bonded Extensions: The Permanent Look
- Microlink Extensions: The Discrete Method
- Hand-Tied Weft Extensions: The Blended Option
- Halo Extensions: The Beginner-Friendly Method
- What the Pros Know
- Common Mistakes to Avoid
- Cost Summary and Timeline
- Choosing Your Method
- Maintenance Keeps Them Lasting
- Frequently Asked Questions
- How long do extensions stay attached before they fall out?
- Can you wash your hair with extensions attached?
- Do extensions damage your natural hair?
- What’s the most affordable option for long-lasting extensions?
- Can you colour or style extensions after attachment?
- Moving Forward with Confidence
You’ve stared at yourself in the mirror for the hundredth time, wondering if those glossy, voluminous locks you saw on Instagram last week are actually achievable. Then you discover it: hair extensions. But before you order them, a practical question stops you. How exactly do these things stay in your hair? What keeps them from sliding down or slipping out at the worst possible moment?
The answer isn’t one-size-fits-all. Hair extensions are attached using several distinct methods, each with its own logic, longevity, and learning curve. Understanding which technique suits your goals—whether you’re after a temporary boost for an event or a longer-term transformation—is where this journey begins.
The Seven Main Methods for Attaching Hair Extensions
Clip-In Extensions: The Non-Permanent Choice
Clip-in extensions are the DIY enthusiast’s first port of call. These extensions come with small metal or plastic clips sewn directly into the hair weft. You simply open the clip, position it against a thin section of your natural hair, and snap it shut. The compression force alone keeps the extension in place.
Most sets contain 5 to 8 individual clip pieces, ranging from £30 to £150 depending on hair quality and weight. You can apply them yourself in about 10 minutes once you get the hang of it. The critical detail: place clips 1 to 2 inches away from your scalp, never directly at the roots. This prevents damage and ensures a more natural appearance.
The catch? They’re removable every night. Sleeping in clip-ins can damage both your natural hair and the extensions themselves. Many users report their clips loosening after 4 to 6 months of daily use, requiring replacement of the clip hardware at around £5 to £15 per clip.
Tape-In Extensions: The Semi-Permanent Solution
Tape-in extensions sandwiches your hair between two sticky strips of adhesive, creating what professionals call a “bond.” Each tape-in weft typically covers 2 to 4 inches of hair width and measures roughly 1.5 inches in length.
The installation process requires precision. You’ll part your hair horizontally, isolate a thin section about 1 to 2 inches from your roots, and press the extension firmly against both sides of that section. A full head typically needs 20 to 50 tape-in pieces, depending on your desired volume and hair thickness. Professional application at a UK salon costs £400 to £700, but self-application kits start at £80 to £200.
These bonds last 6 to 8 weeks before needing repositioning. The adhesive gradually loses tackiness as your natural hair grows and shifts. You’ll need to return to a salon or, if you’re confident, reapply the tape yourself using specific adhesive remover and fresh adhesive strips.
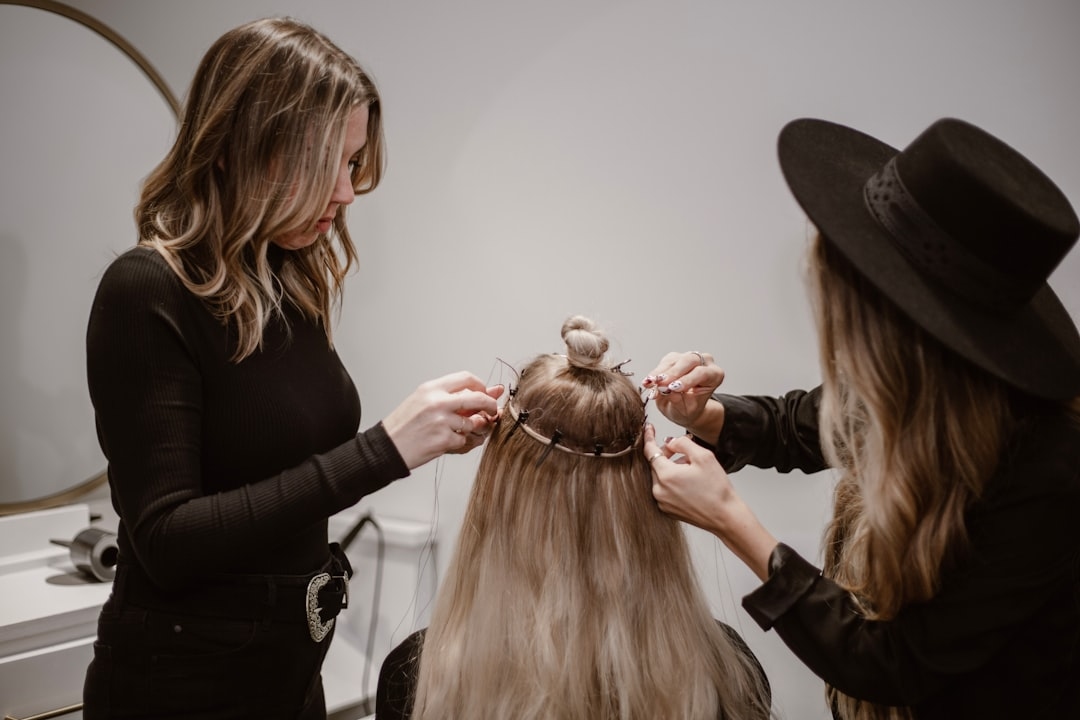
Sew-In Extensions: The Traditional Method
Sew-ins represent one of the oldest attachment methods, still favoured by professionals. A stylist first creates cornrows across your scalp as a foundation. They then hand-sew the extension wefts directly onto these braids using a needle and thread, typically waxed nylon.
This process takes 2 to 4 hours in a salon and costs between £300 and £600 depending on hair length, texture, and quantity. The advantage: sew-ins are incredibly durable, lasting 8 to 12 weeks. They distribute tension more evenly across your scalp than other methods, reducing the risk of traction alopecia (hair loss caused by consistent pulling).
The downside includes visible cornrows if your hair is very short or thin, and the time commitment for installation. You’ll also need professional removal, as attempting to cut sew-ins out yourself risks damaging your natural hair severely.
Fusion or Bonded Extensions: The Permanent Look
Fusion extensions use a keratin-based adhesive or heat-activated bond to attach individual hair strands or small clusters directly to your natural hair. The stylist takes a single strand of extension hair, applies adhesive to the root, and bonds it to a small section of your natural hair using heat or mechanical fusion.
A full head requires 200 to 500 individual bonds, depending on desired thickness. Salon costs reach £800 to £1,500, and installation takes 4 to 6 hours. These extensions last 12 to 16 weeks, the longest of any semi-permanent method.
The bond sits about 0.5 inches from your scalp. As your hair grows, the bond moves further away, requiring repositioning every 8 to 10 weeks. Removal requires dissolving the adhesive with a specially formulated solvent, which must be applied carefully to avoid scalp irritation.
Microlink Extensions: The Discrete Method
Microlinks use tiny metal tubes or beads—typically made from silicone, aluminium, or keratin—to clamp extension hair against your natural strands. A stylist threads your natural hair through the microlink, then through the extension hair, and crimps the tube closed using a specialized tool.
Installation spans 3 to 5 hours and costs £500 to £900 for a full head. Each microlink section lasts 12 to 16 weeks before needing repositioning. The bonds are durable and don’t contain adhesives that might irritate your scalp.
A notable measurement: each microlink weighs approximately 0.3 grams, so a full head of 200 links adds roughly 60 grams (about the weight of a deck of cards) to your hair. This matters if you have fine or fragile natural hair, as the cumulative weight can contribute to breakage over time.
Hand-Tied Weft Extensions: The Blended Option
Hand-tied wefts are constructed by hand-knotting small clusters of hair onto a thin, flexible weft. Stylists then use either glue or sew them onto your natural hair foundation—often cornrows or tape strips.
These extensions offer more movement and a natural appearance than machine-made wefts because they taper at the edges. Professional installation costs £600 to £1,000, and they last 8 to 12 weeks. The hand-tied construction process itself makes them pricier than standard wefts, with quality hand-tied hair starting at £150 to £300 per bundle.
Halo Extensions: The Beginner-Friendly Method
Halo extensions feature a transparent monofilament wire threaded through the top of a weft, which you loop over your head like a headband. No adhesive, clipping, or braiding required. You simply position the wire along your hairline and adjust until it feels secure. Your own hair covers the wire, making the attachment point invisible.
Costs range from £50 to £200, and installation takes under 5 minutes. They’re removable daily, making them ideal for travel, testing whether extensions suit you, or protecting your natural hair. The drawback: they work best for people with medium to thick hair, as fine hair doesn’t grip the wire as effectively.
What the Pros Know
Professional stylists prioritize scalp health above all else. They measure hair thickness before recommending an attachment method. Fine or thinning hair benefits from lighter bonds spread across more application points, such as microlinks or tape-ins, rather than heavy clip-in sets or sew-ins. Pros also avoid placing any bonds directly at the crown, where tension is naturally highest. Instead, they distribute bonds around the mid-scalp and lower regions, ensuring your natural hair bears less stress.
Another insider detail: most professionals recommend changing attachment method every 12 to 18 months, even if you’re happy with your current method. This breaks the pattern of tension on the same scalp areas, allowing your hair time to recover.
Common Mistakes to Avoid
The first error is placing extensions too close to your roots. When bonds sit within half an inch of your scalp, they move with your hair growth and shift your natural hair, accelerating breakage. Leave at least 1 inch of clearance.
Second: ignoring weight limits for your hair type. Even the best attachment method fails if the extensions are too heavy for your natural hair to support. If your hair is fine, avoid large volumes of thick, heavy extensions.
Third: sleeping in clip-ins or halos without removing them. This creates unnecessary tension and loosens the clips faster than intended. Establishing a removal routine every evening protects both your natural hair and the extensions’ longevity.
Fourth: attempting DIY removal of bonded extensions without proper solvent. Using scissors, nail files, or improvised tools risks cutting your hair at the scalp level, causing damage that takes months to grow out.
Cost Summary and Timeline
Here’s what you can expect to pay in 2026 for various methods in the UK:
- Clip-ins: £30–£150 upfront, zero salon costs, replaceable clips at £5–£15 each
- Tape-ins: £80–£200 for DIY kits, or £400–£700 for professional installation
- Sew-ins: £300–£600 professional installation, lasting 8–12 weeks
- Fusion: £800–£1,500 professional, longest lasting at 12–16 weeks per application
- Microlinks: £500–£900 professional, 12–16 weeks duration
- Hand-tied: £600–£1,000 professional, 8–12 weeks
- Halos: £50–£200, removable daily, zero salon required
Factor in repositioning costs every 6 to 10 weeks for semi-permanent methods, which typically run 40 to 60 percent of initial installation prices.
Choosing Your Method
Your choice depends on three factors: commitment level, budget, and hair condition. If you’re testing extensions for the first time, clip-ins or halos are risk-free entry points requiring no salon investment. If you want a weeks-long transformation without daily removal, tape-ins offer the best DIY potential combined with semi-permanent results. If you prioritize hair health and have thick, strong hair, sew-ins distribute tension most evenly. If you want the longest-lasting results and can afford salon visits, fusion or microlinks deliver durability approaching four months.
Maintenance Keeps Them Lasting
Regardless of your chosen method, maintenance is everything. Use a leave-in conditioner on extension hair twice weekly—extensions don’t receive natural oils from your scalp, so they dry out faster than natural hair. Brush gently with a wide-tooth comb or extension-specific brush, starting from the ends and working upward. Avoid chlorine and saltwater for the first 48 hours after installation, when new bonds are still setting.
Sleep on a silk or satin pillowcase or wear a silk sleep bonnet. The smoother fabric reduces friction that loosens clips and causes tangling. Wash extensions separately from your natural hair when possible, using cool or lukewarm water and sulphate-free shampoo.
Frequently Asked Questions
How long do extensions stay attached before they fall out?
Clip-ins stay in place indefinitely if properly secured, but are meant for daily removal. Tape-ins last 6–8 weeks, sew-ins 8–12 weeks, fusion and microlinks 12–16 weeks, and halos stay put as long as you’re wearing them.
Can you wash your hair with extensions attached?
Yes. Wash gently with shampoo and conditioner, directing water downward away from bonds. For tape-ins and fusion bonds, avoid getting adhesive areas soaked. Avoid vigorous rubbing at the roots. Most stylists recommend washing twice weekly rather than daily.
Do extensions damage your natural hair?
Extensions themselves don’t inherently damage hair. Poor installation, excessive weight, neglected maintenance, and leaving bonds in too long cause damage. When applied correctly and maintained well, extensions allow your natural hair to rest and potentially strengthen.
What’s the most affordable option for long-lasting extensions?
DIY tape-in installation offers the best value at £80–£200 upfront, lasting 6–8 weeks. If you’re comfortable reapplying tape yourself, your cost-per-week drops significantly compared to professional installation.
Can you colour or style extensions after attachment?
This depends on your method and hair quality. Synthetic extensions can’t be coloured or heat-styled. Human hair extensions can be coloured, but colouring after installation is tricky if you want consistency with your natural hair. Most stylists recommend pre-colouring extensions before installation or using pre-coloured extensions that match your natural shade.
Moving Forward with Confidence
Understanding how extensions attach removes the mystery from the decision-making process. You now know the mechanics behind each method, what professionals prioritize, and the real costs involved. The next step is assessing your own hair texture, lifestyle, and budget, then selecting the method that aligns with those realities. Start with a method that matches your comfort level, maintain it diligently, and you’ll achieve the fuller, longer locks you’re after—without the damage.